Installation
Here you can read up on how to install and enable the Simplygon UE plugin.
Installing the Simplygon UE plugin
There are two separate installation paths to choose from:
- Using Simplygon installer executable
- Source Control friendly installation - choose this method if you are distributing Unreal Engine using, for example, Perforce.
Alternative 1: Using Simplygon installer executable
Follow the Simplygon install guide (the Unreal Engine plugin for Simplygon is part of the installer).
Important
Simplygon environment variables needs to be setup correctly in order for the plugin to work properly. However, the variables should be automatically created during the installation.
After installing Simplygon you'll find a copy of the plugin at %PROGRAMFILES%/Simplygon/10/UE/[UE Version]. Copy the content from the installation directory to [Project Root]/Plugins.
Build and run your project to start using your new plugin (make sure to enable the plugin).
Alternative 2: Source Control friendly installation
This installation method is the most common way of installing Simplygon SDK for UE developers using a source control manager.
Here is how you set it up:
Download SimplygonSDK.zip
Copy the content from the directory
[Zip root]/UE5/[UE5 version]to[Project root]/Plugins(or if you're building a custom version of Unreal Engine and want to distribute the plugin inside the engine instead of in the project[UE5 root]/Engine/Plugins)Run
[Simplygon plugin root]/InstallSimplygonZip.ps1with the following inputs:
> .\InstallSimplygonZip.ps1 -ZipPath [Path to SimplygonSDK.zip] -InstallLicense [License key][Optional] Add the plugin and Simplygon SDK files to your source control manager.
Build and run UE5 editor to start using your new plugin (make sure to enable the plugin).
Enable the plugin
Run UE5 editor
Enable the plugin by navigating to Edit / Plugins / Simplygon and then check the Enable checkbox.
You are now good to go for using the LOD Recipe and Standin feature set. If you want to use Simplygon as the default reduction plugin for the standard reduction interfaces you need to set this manually. You can either do this using our UI or changing project settings. You can find steps on how to do this below.
Simplygon supports three different built-in reduction interfaces.
- Static Mesh Reduction Module - decides which plugin to use for creating LODs inside the Static Mesh Editor.
- Skeletal Mesh Reduction Module - decides which plugin to use for creating LODs inside the Persona/Skeletal Mesh Editor.
- Proxy LOD Module - decides which plugin to use for HLODs. It is used in the following scenarios:
- In the HLOD Outliner (if you are not using world partition).
- When using the "Simplified Mesh" layer type for HLOD Layers (with world partition).
Important
You need to restart the editor after making changes to what reduction modules to use, otherwise it will still use the old settings.
Set default reduction modules using UI
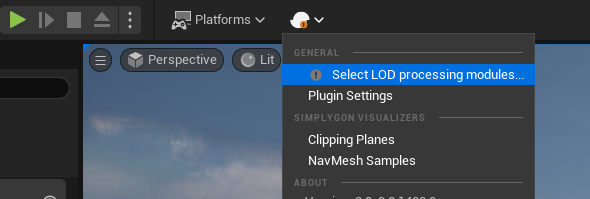
You can find our UI for setting the default reduction modules in the level editor toolbar above the viewport.

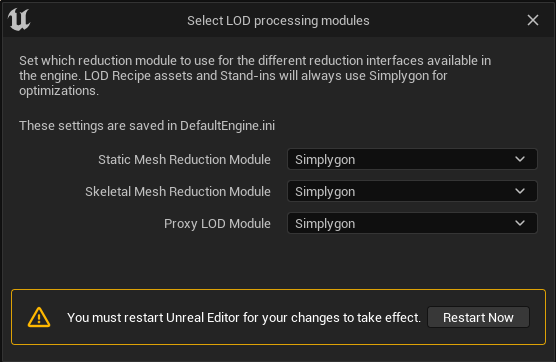
After choosing "Select LOD processing modules..." the following prompt will appear where you can select which built-in interfaces you want to use Simplygon for.

Restart the editor after making any changes.
Set default reduction modules using project settings
You can also set these settings inside the project settings. You can then find them here:
- Static Mesh Reduction Module - Navigate to
Edit / Project Settings / Editor / Mesh Simplification. - Skeletal Mesh Reduction Module - Navigate to
Edit / Project Settings / Editor / Skeletal Mesh Simplification. - Proxy LOD Module - Navigate to
Edit / Project Settings / Editor / Hierarchical LOD Mesh Simplification.
Restart the editor after making any changes.
Validate plugin is enabled
Once you have the plugin installed and enabled (completed the steps above) you can validate that the plugin is running.
Level editor status logo
The Simplygon logo in the level editor's toolbar provides you with helpful information of the status of the plugin. For more information about the status, hover the logo to show the tooltip.
| Status | Description |
|---|---|
| Plugin is running normally with a valid license and all mesh reduction interfaces are using Simplygon. | |
| Plugin is running normally with a valid license, but not all mesh reduction interfaces are using Simplygon. Check the logo tooltip for more information. | |
| Plugin is disabled for some reason. Check the Window / Developer Tools / Output Log for errors. |
Troubleshoot using output log
Run the editor and open Window / Output Log
Type MeshReduction in the search field:

 Simplygon 10.2.5200.0