# Modular Seams
# Overview
Modular assets that share seams/borders of vertex coordinates can be analyzed in a pre-reduction step using the Modular seam analyzer. The analyzer finds the modular seams (shared borders) for all the geometries being analyzed and figures out the optimal reduction along each shared seam. The analyzed modular seam structure can then be stored and re-used for all future geometries that share these borders to ensure the LODs have the exact same deterministic reduction performed on their shared borders. By using the Modular seam analyzer and modular seam structure when reducing, the borders between the parts can be made certain to remain gapless.
If video above isn't playing, try refreshing or right clicking to select "show controls" and then play.
 |  |  |  |
|---|---|---|---|
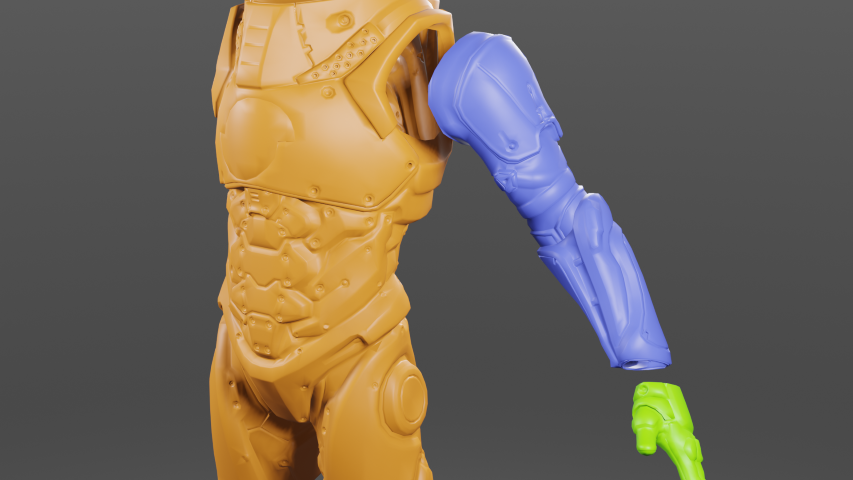
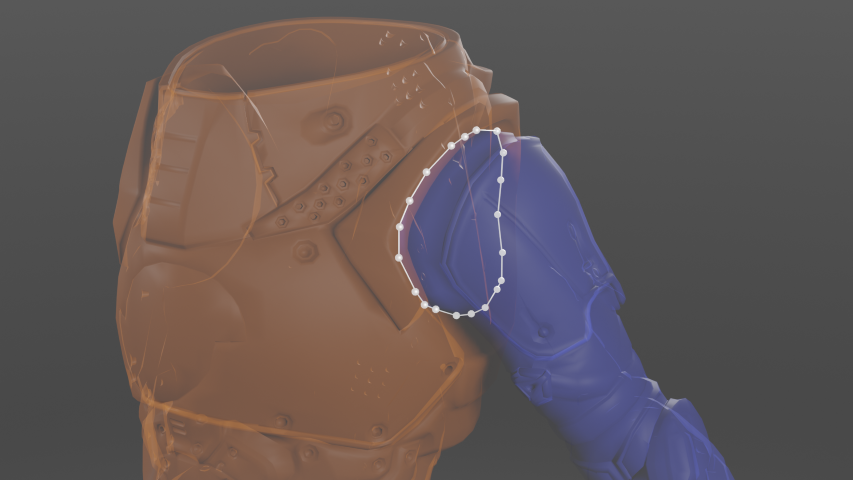
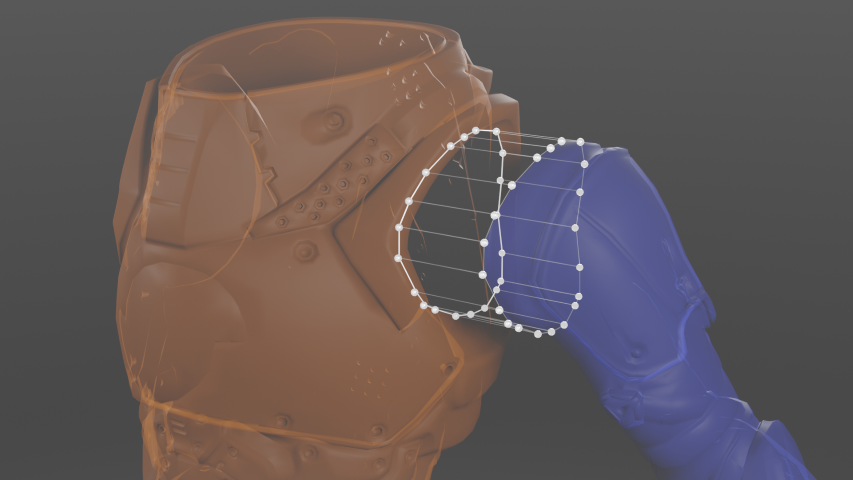
| Three modular parts together. Body, arm and hand. | Exploded view. | The modular seam shared between both the body and arm that is automatically detected by the Modular seam Analyzer. | To ensure gapless reduction, the geometry border will be identically reduced for all objects sharing this seam. |
# Types of assets
An ideal type of assets is interchangeable body parts, where each head has the exact same border of edges as every other head and they fit exactly with every torso. By analyzing both the heads and torsos together, the Modular seam analyzer can figure out a reduction that takes them all into account to assure that fields (such as UV-borders) will be preserved on both the heads and torsos, for instance.
# Settings
The settings should generally not be changed after geometries have been added to the Modular seam analyzer.
# Automatic seam detection
Enabled by: EModularSeamDetectionType::Automatic, EModularSeamDetectionType::AutomaticAndManual.
The Modular seam analyzer can automatically search the geometries for connected geometry borders and categorize them as modular seams. If the same modular seam is found across multiple meshes, then they will be grouped together to ensure identical reduction.
# Only closed borders
Enabled by: EAutomaticModularSeamDetectionType::OnlyClosed
If the user knows beforehand that the only type of modular seams they want to be considered are closed loops of geometry borders then they can choose this option. This is a subset of treating all connected geometry borders as modular seams, because one vertex can only have two modular seam edges attached to it.
 |
|---|
| Closed-loop modular seam. |
# All geometry borders
Enabled by: EAutomaticModularSeamDetectionType::GeometryBorders
This option identifies all connected geometry borders as modular seams. A vertex on the seam can be connected to any number of geometry border edges.
 | Example of geometry borders that don't form a closed spline. |
 | Another example. One vertex is connected to 4 modular seam edges. |
# Manual seam markup
Enabled by: EModularSeamDetectionType::Manual, EModularSeamDetectionType::AutomaticAndManual
The user can manually specify which edges should be treated as modular seams. The edges do not have to be geometry borders.
 |
|---|
| Manually marked up edges that are not geometry borders. |
# Toggle per edge
Enabled by: EManualModularSeamDetectionType::TogglePerEdge
This is the simple option where the user only specifies whether an edge is part of a modular seam or not. The Modular seam analyzer will then group all connected modular seam edges together. Use spModularSeamAnalyzer::GetManualSeamArray(geometryData) to get the per-edge field for a GeometryData.
# ID per edge
Enabled by: EManualModularSeamDetectionType::SeamIdPerEdge
This is the more advanced option where the user specifies exactly which modular seam each edge belong to (-1 means it is not a modular seam). Use SgModularSeamAnalyzer::GetManualSeamIdsArray(geometryData) to get the per-edge field for a GeometryData. By explicitly doing this markup the Modular seam analyzer can validate that the data is correct and notify the user if anything is wrong. For instance:
- If the head-torso seam is marked up as seamId: 1 on both a head asset and a torso asset - it will only be valid if the edges match precisely (within tolerance) and their topology along the border is identical.
- Two edges that have the same modular seam id but are not connected via edges that share the same id, will also result in a validation error.
- If edges that have different modular seam ids (-1 is excluded) are connected to each other it will also result in a validation error.
# Tolerance
The Modular seam analyzer treats coordinates that are closer to each other than the tolerance value as the same coordinate. The user sets the tolerance and it should be a small value in regards to the full set of assets being analyzed.
# Only analyze shared seams
The setting OnlyAnalyzeSharedSeams controls whether to only analyze identified modular seams that are found on multiple geometries. If the setting is turned on, then a single head asset with a head-torso seam will not be analyzed unless there is at least one more head or a torso asset with that same head-torso seam. This can be a way to filter out unwanted seams that happens on individual parts. If the setting is on, any identified modular seam (group of connected geometry border in the automatic detection case, or any connected manually marked up seam) will be analyzed and available later for reduction with the caveat that only the head (in this example) has contributed. It will still generate gapless reduction if used with torso assets later on, but their geometry and fields will not have been taken into account.
# Translation independence
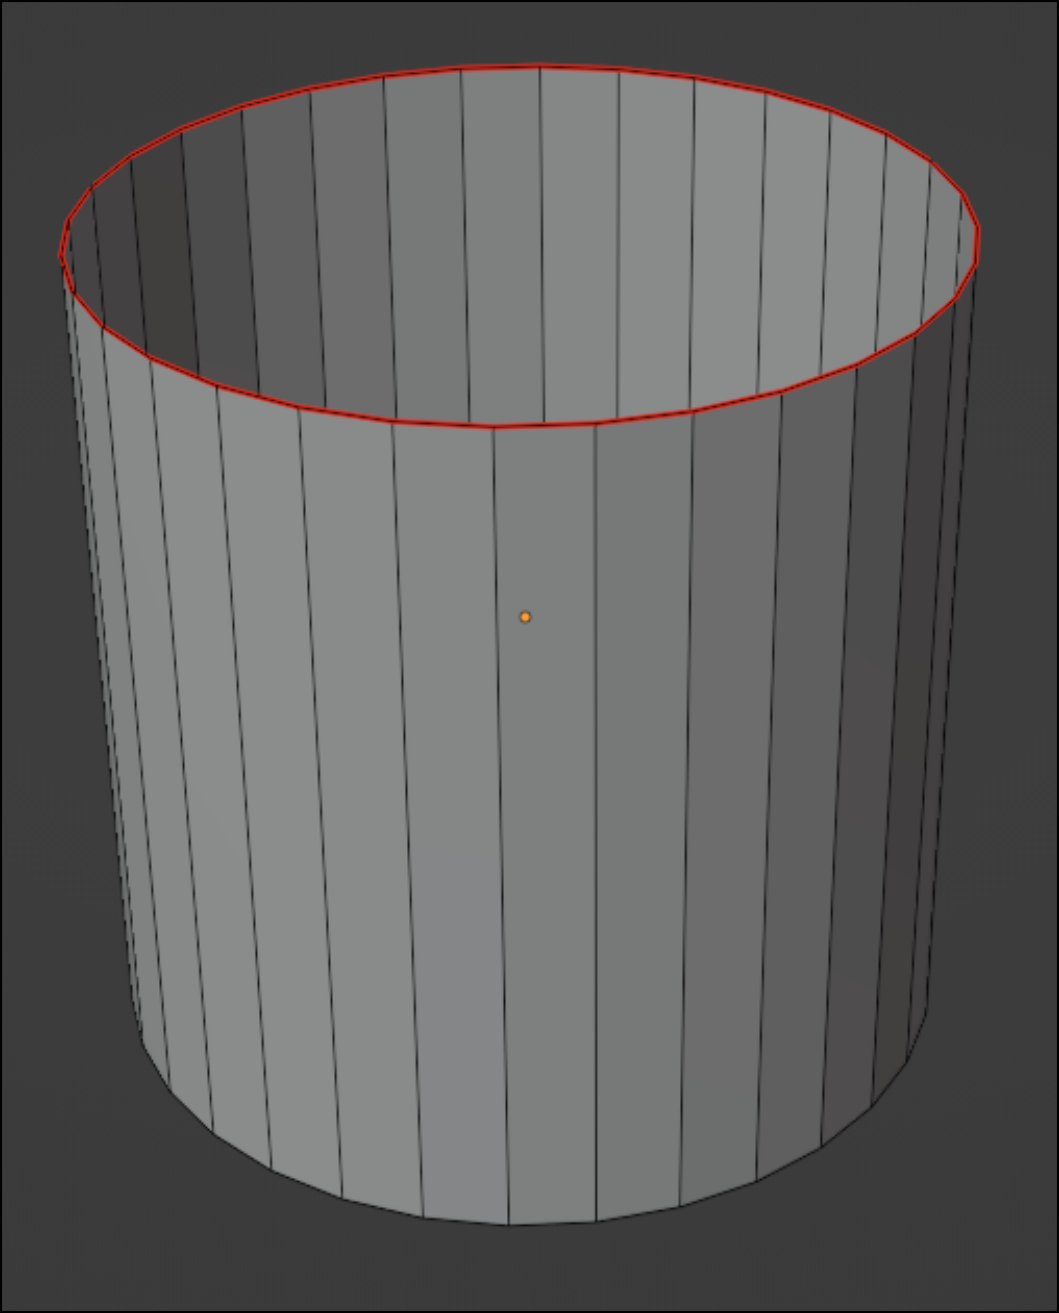
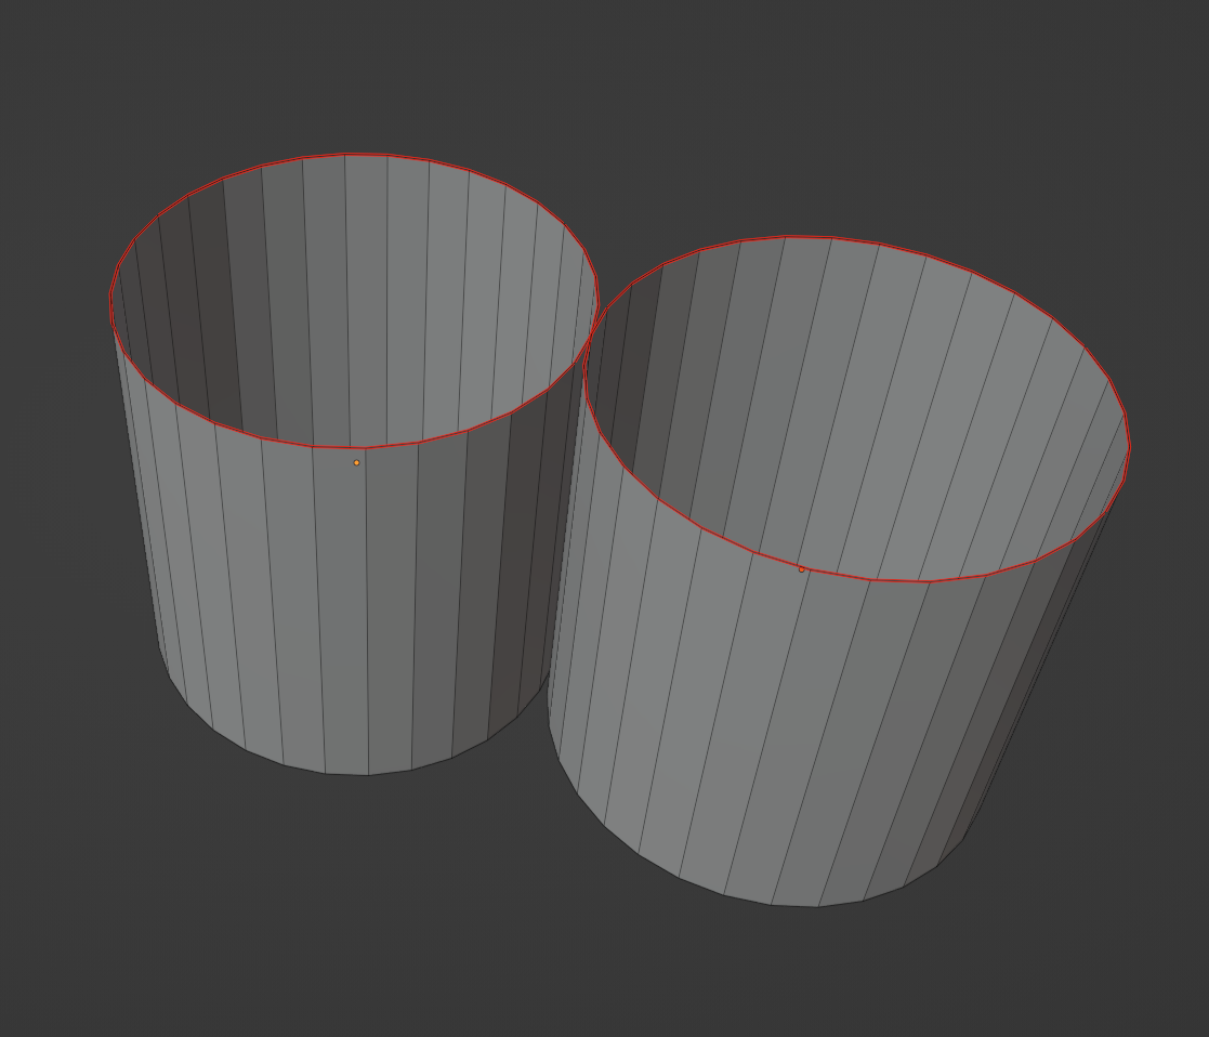
The setting IsTranslationIndependent will make the analyzer ignore where the modular seams are located so that all geometries can be analyzed in their own local coordinates. An open cylinder (if automatic detection is on) will identify the top and bottom spline as the same modular seam. If the setting is off, then all parts need to be exactly located so they fit together when placed in the same scene.
# Workflow
# Workflow Summary
Generate modular seams
- Create the Modular seam analyzer and set the seam detection settings
- Add any number of modular geometries to it
- Optionally change feature importances in the reduction settings
- Run Analyze
- Save generated modular seams
Reduce with modular seams
- Load pre-generated modular seams
- Create a Reduction processor
- Add the modular seams and their reduction targets to the Reduction processor's Modular seam settings
- Run the Reduction
# Detailed workflow
Create a Modular seam analyzer and add the associated modular parts.
spModularSeamAnalyzer modularSeamAnalyzer = sg->CreateModularSeamAnalyzer()

// Set detection settings before adding geometries, they cannot be changed after geometries have been added
modularSeamAnalyzer->SetModularSeamDetectionType( EModularSeamDetectionType::Automatic );
modularSeamAnalyzer->SetAutomaticModularSeamDetectionType( EAutomaticModularSeamDetectionType::GeometryBorders );

// Figure out a small value in relation to the scene that will be the tolerance for the modular seams
// if a coordinate is moved a distance smaller than the tolerance, then it is regarded as the same coordinate
// So two vertices are the at the same place if the distance between them is smaller than radius * smallValue
allObjectsScene->CalculateExtents();
const Simplygon::real smallValue = 0.0001f;
Simplygon::real tolerance = allObjectsScene->GetRadius() * smallValue;
modularSeamAnalyzer->SetTolerance( tolerance );

// Add any number of geometries
modularSeamAnalyzer->AddGeometry( modularGeometry0 )
modularSeamAnalyzer->AddGeometry( modularGeometry1 )
modularSeamAnalyzer->AddGeometry( modularGeometry2 )
Call Analyze(). All shared seams will be analyzed together to figure out the optimal reduction along the seams themselves. Every part contributes to ensure their geometry, vertex normals, UV fields and so on are taken into consideration. If a certain field is more or less important this can be tuned by tweaking the feature importances in the ModularSeamAnalyzer's ReductionSettings.
// The importances can be changed here to allow the features to be weighed differently
// both during regular reduction and during the analyzing of modular seam
reductionSettings->SetEdgeSetImportance( 1.0f );
reductionSettings->SetGeometryImportance( 1.0f );
reductionSettings->SetGroupImportance( 1.0f );
reductionSettings->SetMaterialImportance( 1.0f );
reductionSettings->SetShadingImportance( 1.0f );
reductionSettings->SetSkinningImportance( 1.0f );
reductionSettings->SetTextureImportance( 1.0f );
reductionSettings->SetVertexColorImportance( 1.0f );

modularSeamAnalyzer->Analyze( reductionSettings );
Fetch the Modular seam structure when the parts have been analyzed. The structure can be stored to disk to be used later for all subsequent modular parts that share these border seams.
// Fetch the modular seams. These can be stored to file and used later
std::string outputmodularSeams = "modularSeams";
std::string outputSeams = GetOutputPath() + outputmodularSeams;
spModularSeams modularSeams = modularSeamAnalyzer->GetModularSeams();
modularSeams->SaveToFile( outputSeams.c_str() );
Now that the modular seams have been stored there is no need to use the Modular seam analyzer again unless future modular parts either have non-identical seams or they have become very different (other UV seams for instance) to the old representative assets.
Every modular part can now be reduced using the ReductionProcessor, both analyzed and non-analyzed parts. Run the ReductionProcessor and supply it with the modular seam structure and the settings for how much the modular seams should be reduced. Make sure that the ModularSeamSettings are persistent for all Modular parts being reduced to ensure identical borders. The seams will be reduced deterministically by themselves and the rest of the geometry will be reduced like normally using the regular Reduction settings.
modularSeams->LoadFromFile( outputSeams.c_str() );

// Run reduction on each geometry individually,
// feed the modular seams into the reducer with the ModularSeamSettings
// so the modular seams are reduced identically and are untouched by the rest of the
// geometry reduction

spReductionProcessor reductionProcessor = sg->CreateReductionProcessor();
reductionProcessor->SetScene( singleAssetScene );

reductionProcessor->GetReductionSettings()->SetReductionTargetTriangleRatio( triangleRatio );

spModularSeamSettings modularSeamSettings = reductionProcessor->GetModularSeamSettings();
modularSeamSettings->SetReductionRatio( modularSeamReductionRatio );
modularSeamSettings->SetStopCondition( EStopCondition::Any );
modularSeamSettings->SetModularSeams( modularSeams );

reductionProcessor->RunProcessing();
# Limitations
- Modular seams does not currently work with cascaded pipelines.
# Usage
The ModularSeams can be used through the following entry points:
# Simplygon API example
This example shows how to use the Reduction processor with modular seams.