# Simple remeshing with material baking - Scripting
In the following example we will continue expanding the script we wrote in Getting Started - Scripting to optimize the selected geometries using a RemeshingPipeline. Remeshing means that the optimized asset will be a completely new mesh with no ties to the original asset. The RemeshingPipeline allows various reduction targets, in this example we will generate an optimized mesh for a specific OnScreenSize of 300 pixels. The output will be one mesh that represents all input meshes. We will also enable material baking for the RemeshingPipeline, which means that the optimized asset will get one baked material for the entire mesh, one uv-set, and one texture per baked material channel.
A quick recap of what we did in 'Getting Started - Scripting' was a Unity C# script that exposes an entry point method as menu item accessible through the Unity menu. The entry point method checks if there is at least one selected item, and if so initializes Simplygon and passes on the simplygon handle as well as each GameObject to a place holder method.
The script below is the starting point of this example, we've renamed the menu item to 'SimplygonRemeshingScript' as well as the place holder method to Remesh. The place holder method is what we will extend to allow Simplygon to optimize selected geometries.
using Simplygon;
using Simplygon.Unity.EditorPlugin;
using System.Collections.Generic;
using UnityEditor;
using UnityEngine;

public class SimpleRemeshing : MonoBehaviour
{
    [MenuItem("Simplygon/SimpleRemeshingScript")]
    static void EntryPoint()
    {
        if (Selection.objects.Length > 0)
        {
            using (ISimplygon simplygon = global::Simplygon.Loader.InitSimplygon
            (out EErrorCodes simplygonErrorCode, out string simplygonErrorMessage))
            {
                if (simplygonErrorCode == Simplygon.EErrorCodes.NoError)
                {
                    foreach (var o in Selection.objects)
                    {
                        Remesh(o as GameObject, simplygon);
                    }
                }
                else
                {
                    Debug.Log("Initializing failed!");
                }
            }
        }
    }

    public static void Remesh(GameObject gameObject, ISimplygon simplygon)
    {

    }
}
The Simplygon Unity plug-in is utilizing USD as intermediate file format between Unity and Simplygon, for the best experience we recommend using the same export and import method as the plug-in, to keep the behavior consistent. When the Simplygon Unity plug-in is installed we can access those methods.
Simplygon.Unity.EditorPlugin.SimplygonExporter.ExportSimplygon.Unity.EditorPlugin.SimplygonImporter.Import
As well as the SimplygonUtils class (optional).
Simplygon.Unity.EditorPlugin.SimplygonUtils
If we focus on the Remesh method we can see that we get a GameObject as well as Simplygon handle as input parameters. Next up is to export the currently selected (Unity) GameObject using SimplygonExporter.Export which will export the scene through USD to a temporary directory. This export call also returns the converted scene (Simplygon scene) which is required for most API calls.
The SimplygonExporter.Export takes the Simplygon handle, temporary export directory and list of GameObjects of which to export (including children). Let's try to add the export of the scene to the Remesh method.
The game objects need to be placed in a list, let's put them in a list. We also need to populate that export directory, this can be done manually, but we'll use SimplygonUtils.GetNewTempDirectory for this example. We should now be able to call the Export method.
public static void Remesh(GameObject gameObject, ISimplygon simplygon)
{
    List<GameObject> selectedGameObjects = new List<GameObject>();
    selectedGameObjects.Add(gameObject);

    string exportTempDirectory = SimplygonUtils.GetNewTempDirectory();

    using (spScene sgScene = SimplygonExporter.Export(simplygon, exportTempDirectory, selectedGameObjects))
    {

    }
}
Now that we have the Simplygon scene we need to describe what kind of optimization we want to do. In this example we will set up a remeshing with a target OnScreenSize of 300 px. We will also set up material baking with two material channels, diffuseColor and normal (see Unity to USD material channel mapping). The Simplygon API provides Pipelines which encapsulates processing settings and execution functionality. To avoid pure low level API calls we will utilize the RemeshingPipeline, it has all the settings we are interested in and is fairly easy to configure.
Let's create a RemeshingPipeline and fetch the RemeshingSettings. These are the API settings for the RemeshingProcessor, for more details of what each setting do, please visit the RemeshingProcessor documentation.
If we look at what settings are available in RemeshingSettings we can see that there is an OnScreenSize setting, set it to 300.
remeshingSettings.SetOnScreenSize(300);
For the material baking part we need to specify some settings for the output, that Simplygon should generate UVs as well as apply new material ids. This is achieved through the pipeline's MappingImageSettings. We also need to set the number of output materials, which in this case is 1.
spMappingImageSettings mappingImageSettings = remeshingPipeline.GetMappingImageSettings();
mappingImageSettings.SetGenerateTexCoords(true);
mappingImageSettings.SetApplyNewMaterialIds(true);
mappingImageSettings.SetOutputMaterialCount(1);
To specify the texture dimensions for the output material we need to fetch the material settings for the output material in mapping image settings. Set the Width and Height to 512.
spMappingImageOutputMaterialSettings materialOutputSettings = mappingImageSettings.GetOutputMaterialSettings(0);
materialOutputSettings.SetTextureHeight(512);
materialOutputSettings.SetTextureHeight(512);
Now we need to define which material channels to bake. 'Albedo' in Unity translates to 'diffuseColor' in USD. The channel is merely a color channel so we'll set up a ColorCaster with the material channel name set to 'diffuseColor'.
spColorCaster colorCaster = simplygon.CreateColorCaster();
spColorCasterSettings colorCasterSettings = colorCaster.GetColorCasterSettings();
colorCasterSettings.SetMaterialChannel("diffuseColor");
Unity's Normal Map channel translates to normal in USD, as it is a normal map we need to set up a NormalCaster with the material channel name set to 'normal'. To generate a normal map that is compatible with Unity we also need to enable GenerateTangentSpaceNormals and FlipGreen, as well as make sure that CalculateBitangentPerFragment and NormalizeInterpolatedTangentSpace are disabled.
spNormalCaster normalCaster = simplygon.CreateNormalCaster();
spNormalCasterSettings normalCasterSettings = normalCaster.GetNormalCasterSettings();
normalCasterSettings.SetMaterialChannel("normal");
normalCasterSettings.SetGenerateTangentSpaceNormals(true);
normalCasterSettings.SetFlipGreen(true);
normalCasterSettings.SetCalculateBitangentPerFragment(false);
normalCasterSettings.SetNormalizeInterpolatedTangentSpace(false);
The last step for material baking is to simply assign the color caster and normal caster to the pipeline, through AddMaterialCaster. The second parameter is simply the target output material index, we only have one output material so the index should be set to 0.
remeshingPipeline.AddMaterialCaster(colorCaster, 0);
remeshingPipeline.AddMaterialCaster(normalCaster, 0);
Our Remesh method should now look something like below.
public static void Remesh(GameObject gameObject, ISimplygon simplygon)
{
    List<GameObject> selectedGameObjects = new List<GameObject>();
    selectedGameObjects.Add(gameObject);

    string exportTempDirectory = SimplygonUtils.GetNewTempDirectory();

    using (spScene sgScene = SimplygonExporter.Export(simplygon, exportTempDirectory, selectedGameObjects))
    {
        using (spRemeshingPipeline remeshingPipeline = simplygon.CreateRemeshingPipeline())
        using (spRemeshingSettings remeshingSettings = remeshingPipeline.GetRemeshingSettings())
        {
            remeshingSettings.SetOnScreenSize(300);

            spMappingImageSettings mappingImageSettings = remeshingPipeline.GetMappingImageSettings();
            mappingImageSettings.SetGenerateTexCoords(true);
            mappingImageSettings.SetApplyNewMaterialIds(true);
            mappingImageSettings.SetOutputMaterialCount(1);

            spMappingImageOutputMaterialSettings materialOutputSettings =
                mappingImageSettings.GetOutputMaterialSettings(0);
            materialOutputSettings.SetTextureHeight(512);
            materialOutputSettings.SetTextureHeight(512);

            spColorCaster colorCaster = simplygon.CreateColorCaster();
            spColorCasterSettings colorCasterSettings = colorCaster.GetColorCasterSettings();
            colorCasterSettings.SetMaterialChannel("diffuseColor");

            spNormalCaster normalCaster = simplygon.CreateNormalCaster();
            spNormalCasterSettings normalCasterSettings = normalCaster.GetNormalCasterSettings();
            normalCasterSettings.SetMaterialChannel("normal");
            normalCasterSettings.SetGenerateTangentSpaceNormals(true);
            normalCasterSettings.SetFlipGreen(true);
            normalCasterSettings.SetCalculateBitangentPerFragment(false);
            normalCasterSettings.SetNormalizeInterpolatedTangentSpace(false);

            remeshingPipeline.AddMaterialCaster(colorCaster, 0);
            remeshingPipeline.AddMaterialCaster(normalCaster, 0);
        }
    }
}
As the Pipeline is responsible for execution we can use it to optimize the scene for us, simply call remeshingPipeline.RunScene with the scene as first argument, and the RunInThisProcess as second argument. See EPipelineRunMode for more execution options.
remeshingPipeline.RunScene(sgScene, EPipelineRunMode.RunInThisProcess);
When the optimization has completed the pipeline will hold the optimized scene(s). To directly import the results stored in the pipeline into Unity, lets utilize SimplygonImporter.Import. The arguments for Import are the Simplygon handle, the pipeline with the optimized scene(s), initial LOD index, (Unity) asset folder path and the name of imported object once inside Unity.
For the import path we will simply use 'AssetDatabase' as it will handle name clashes and indexing. We'll place the result in the project's 'Asset/SimpleRemeshings' folder, as well as use the original selected node name (SimplygonImporter.Import will append '_LODX' prefix).
public static void Remesh(GameObject gameObject, ISimplygon simplygon)
{
    List<GameObject> selectedGameObjects = new List<GameObject>();
    selectedGameObjects.Add(gameObject);

    string exportTempDirectory = SimplygonUtils.GetNewTempDirectory();

    using (spScene sgScene = SimplygonExporter.Export(simplygon, exportTempDirectory, selectedGameObjects))
    {
        using (spRemeshingPipeline remeshingPipeline = simplygon.CreateRemeshingPipeline())
        using (spRemeshingSettings remeshingSettings = remeshingPipeline.GetRemeshingSettings())
        {
            remeshingSettings.SetOnScreenSize(300);

            spMappingImageSettings mappingImageSettings = remeshingPipeline.GetMappingImageSettings();
            mappingImageSettings.SetGenerateTexCoords(true);
            mappingImageSettings.SetApplyNewMaterialIds(true);
            mappingImageSettings.SetOutputMaterialCount(1);

            spMappingImageOutputMaterialSettings materialOutputSettings =
                mappingImageSettings.GetOutputMaterialSettings(0);
            materialOutputSettings.SetTextureHeight(512);
            materialOutputSettings.SetTextureHeight(512);

            spColorCaster colorCaster = simplygon.CreateColorCaster();
            spColorCasterSettings colorCasterSettings = colorCaster.GetColorCasterSettings();
            colorCasterSettings.SetMaterialChannel("diffuseColor");

            spNormalCaster normalCaster = simplygon.CreateNormalCaster();
            spNormalCasterSettings normalCasterSettings = normalCaster.GetNormalCasterSettings();
            normalCasterSettings.SetMaterialChannel("normal");
            normalCasterSettings.SetGenerateTangentSpaceNormals(true);
            normalCasterSettings.SetFlipGreen(true);
            normalCasterSettings.SetCalculateBitangentPerFragment(false);
            normalCasterSettings.SetNormalizeInterpolatedTangentSpace(false);

            remeshingPipeline.AddMaterialCaster(colorCaster, 0);
            remeshingPipeline.AddMaterialCaster(normalCaster, 0);

            remeshingPipeline.RunScene(sgScene, EPipelineRunMode.RunInThisProcess);

            string baseFolder = "Assets/SimpleRemeshings";
            if (!AssetDatabase.IsValidFolder(baseFolder))
            {
                AssetDatabase.CreateFolder("Assets", "SimpleRemeshings");
            }

            string assetFolderGuid = AssetDatabase.CreateFolder(baseFolder, gameObject.name);
            string assetFolderPath = AssetDatabase.GUIDToAssetPath(assetFolderGuid);

            int startingLodIndex = 0;
            SimplygonImporter.Import(simplygon, remeshingPipeline, ref startingLodIndex,
                assetFolderPath, gameObject.name);
        }
    }
}
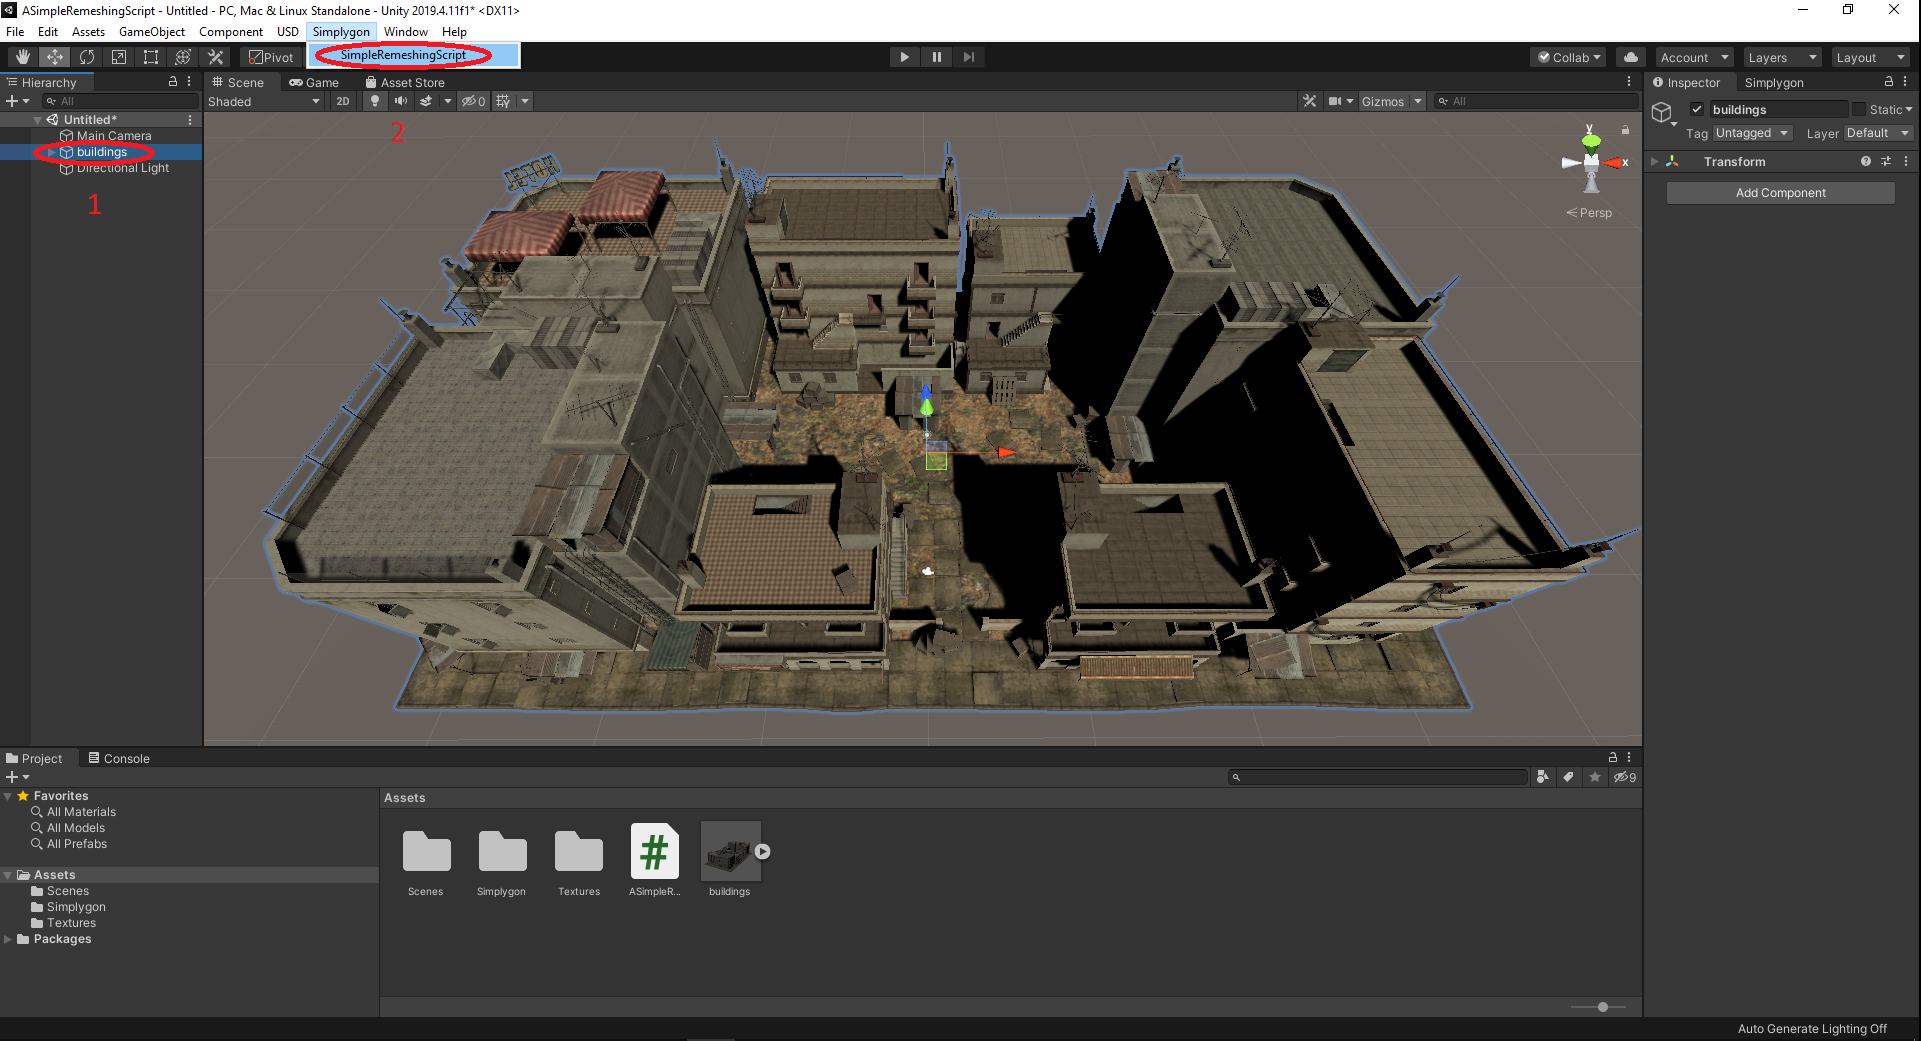
That is it, let's go back to Unity, import an asset, select the object(s) and run the script. In this example we will use this city block, a complex asset with many meshes, materials and textures,
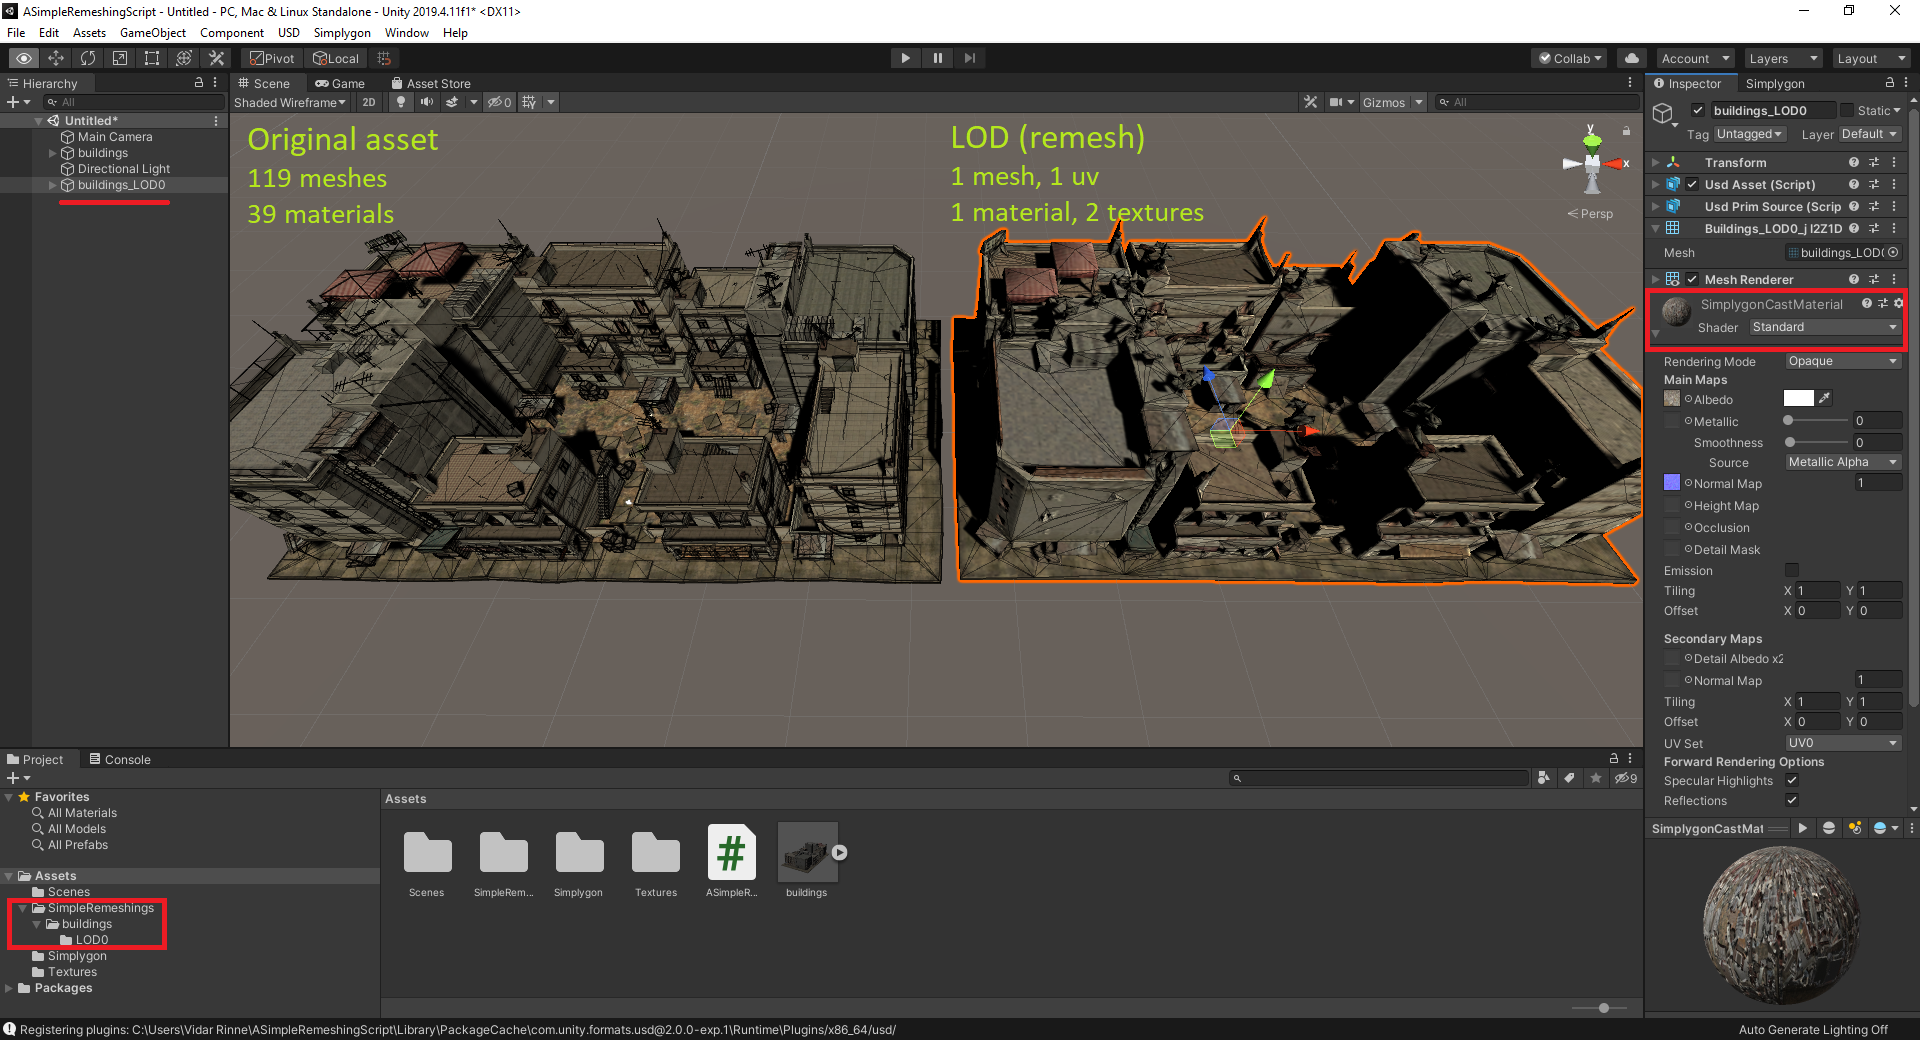
Once the optimization has completed the result will get imported back to the scene. See the result in the image below, the original asset to the left, the optimized asset to the right. Keep in mind that the optimized asset is generated to be displayed at a size of 300 pixels.
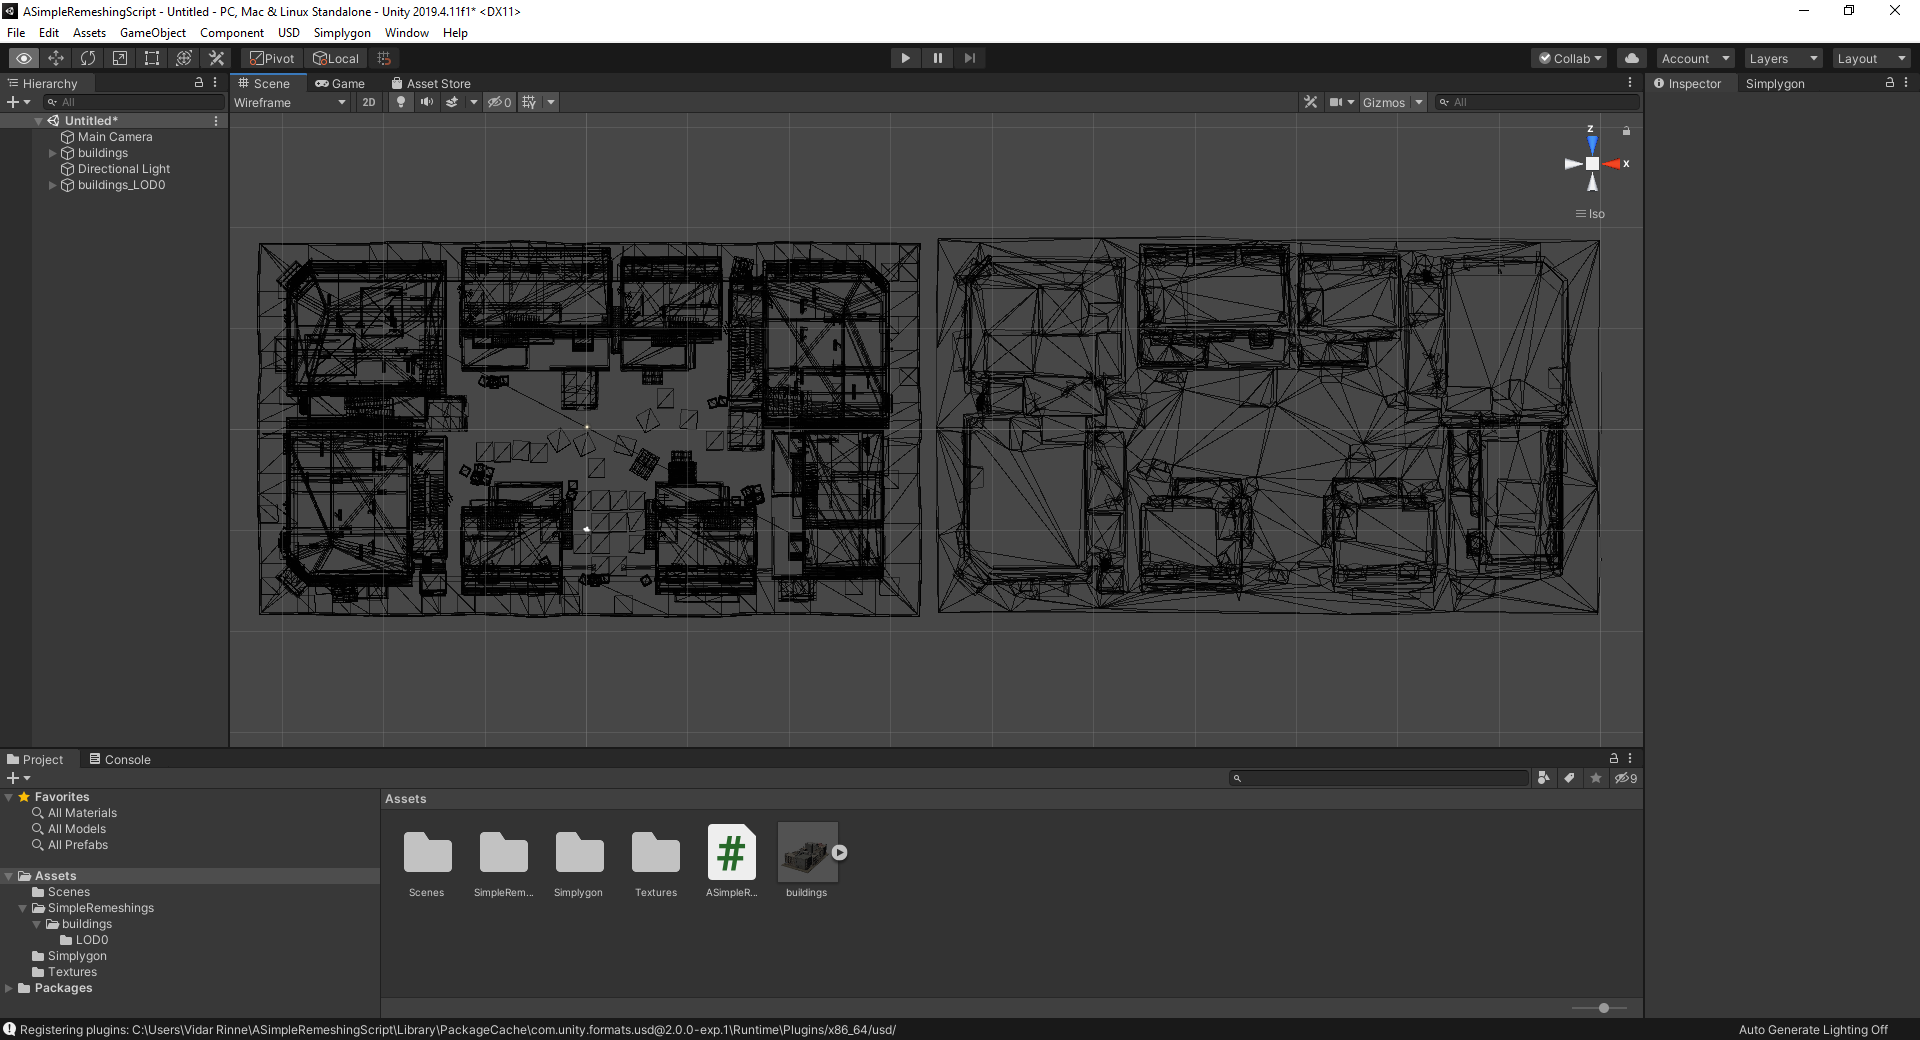
Top-down wireframe.
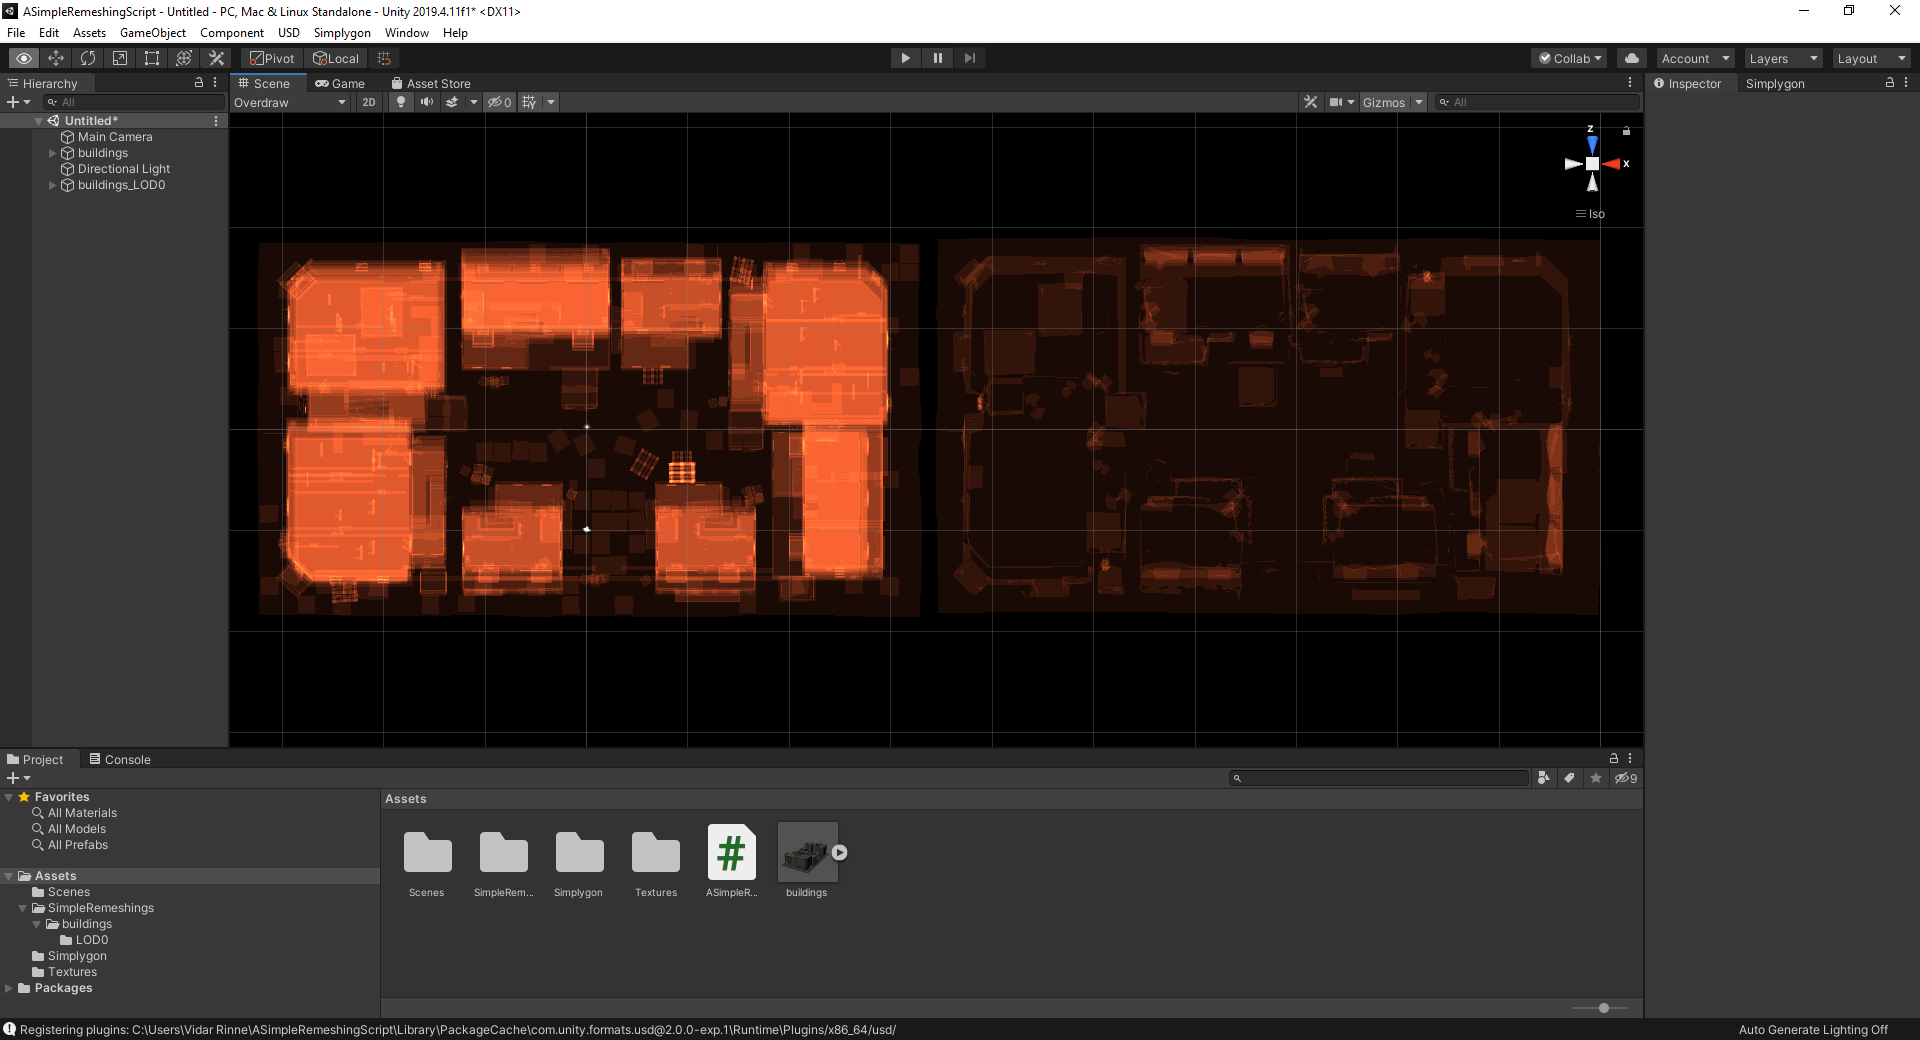
Top-down overdraw, yellow / red-ish is more, black is less.
If possible, try this example with various pipelines such as Reduction and Aggregation, with and without material baking.